This website contains affiliate links. Some products are gifted by the brand to test. As an Amazon Associate, I earn from qualifying purchases. The content on this website was created with the help of AI.
Transform your cluttered kitchen cabinets with these game-changing organization hacks. Start by installing pull-out drawer systems and door-mounted racks to maximize vertical space. Add shelf risers to double your storage capacity, and use drawer dividers to create designated zones for utensils and tools. Mount lid organizers and hooks on cabinet doors for efficient storage. Group items by category and usage frequency, placing everyday essentials in easy-to-reach spots. Don’t forget to label everything clearly and maintain a rotation system. These proven solutions will help you reveal your kitchen’s full organizational potential.
Key Takeaways
- Create distinct zones in your cabinets based on usage frequency, keeping daily items easily accessible and occasional items stored further back.
- Install pull-out drawer systems with custom-fitted organizers to maximize cabinet depth and eliminate hard-to-reach corners.
- Use door-mounted storage racks and hooks to reclaim unused cabinet space for spices, lids, and cleaning supplies.
- Implement drawer dividers and double-tiered organizers to separate utensils, measuring tools, and cooking implements by category.
- Add shelf risers to double vertical storage space, keeping plates, bowls, and canned goods visible and accessible.
Install Pull-Out Drawer Systems
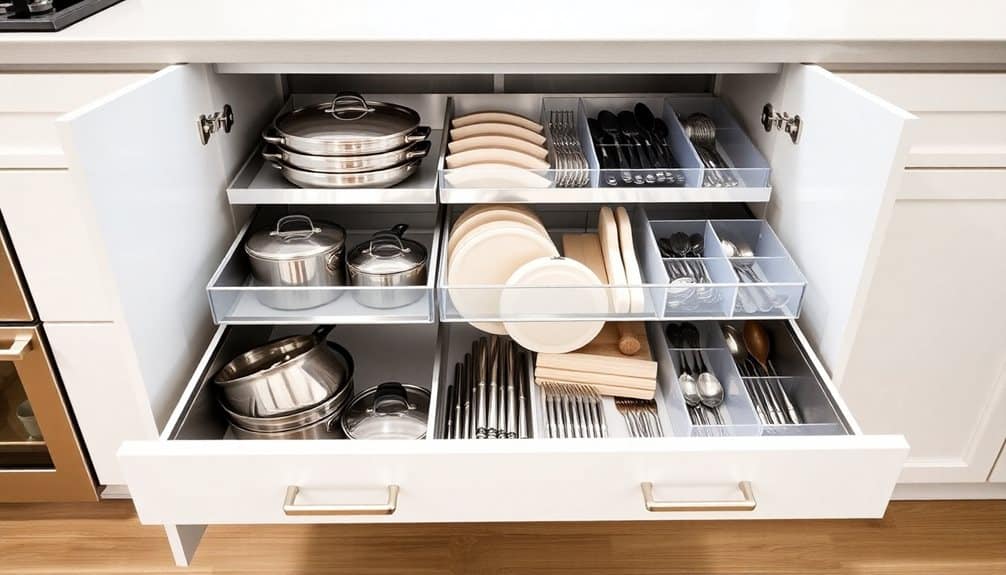
Installing pull-out drawer systems transforms chaotic cabinets into easily accessible storage spaces. These custom-fitted organizers maximize your cabinet’s depth while eliminating the need to reach into dark corners. You’ll find various styles available, from basic single-tier slides to multi-level configurations that accommodate different item heights.
Start by measuring your cabinet’s interior dimensions and selecting pull-out systems that fit your space. You’ll need to account for drawer width, depth, and height clearance. Choose between full-extension or partial-extension slides based on your accessibility needs. Full-extension slides offer complete visibility of contents but require more installation precision.
Mount the slide brackets to your cabinet’s side walls using a level and appropriate screws. Verify they’re parallel and at equal heights for smooth operation. Most systems include adjustable brackets that let you fine-tune the drawer’s position. Install the drawer unit onto the slides, test the movement, and adjust as needed.
For enhanced organization, add dividers or bins within the pull-out drawers. These compartments keep items separated and prevent shifting during drawer operation. Consider clear containers for pantry items to maintain visibility and freshness.
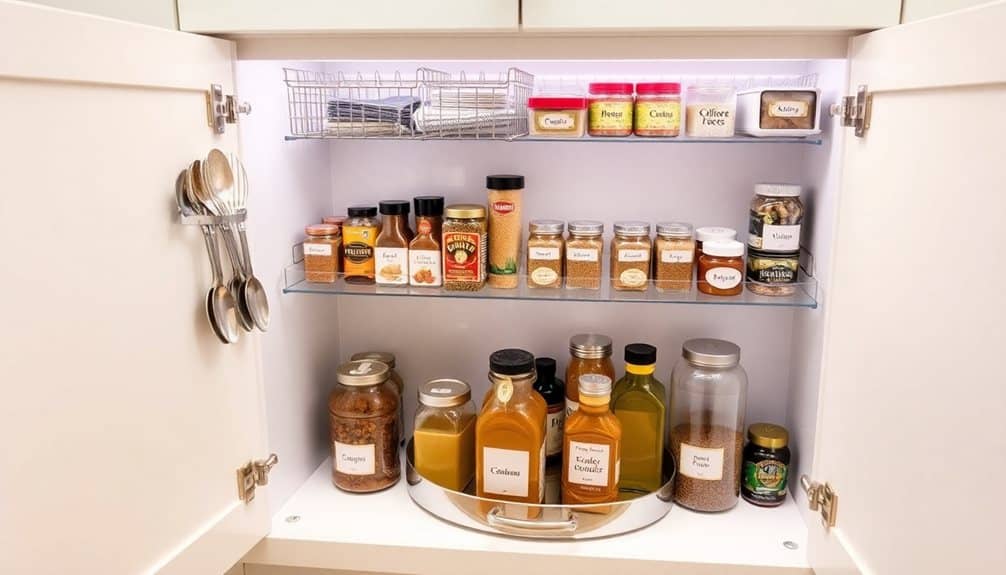
Use Door-Mounted Storage Racks
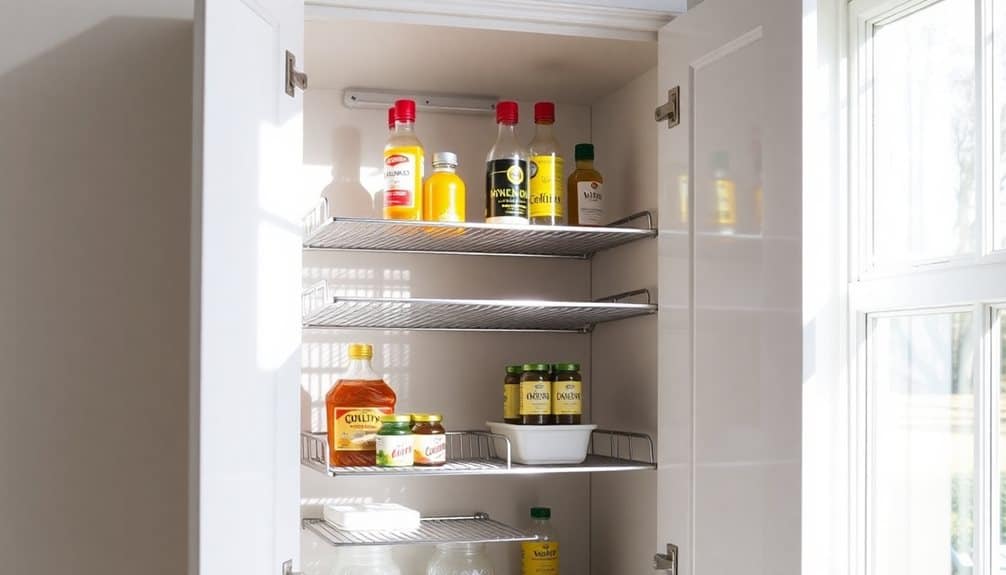
Door-mounted storage racks offer a clever way to reclaim unused cabinet space, turning plain door surfaces into valuable organizational zones. You’ll find various types of door-mounted solutions, from wire racks to clear plastic organizers, each designed to maximize vertical storage potential while keeping items easily accessible.
To install door-mounted racks effectively, measure your cabinet door’s dimensions and verify there’s adequate clearance for the rack when the door closes. Choose racks with adjustable mounting brackets to accommodate different door styles and thicknesses. For under-sink cabinets, select rust-resistant materials that can withstand moisture exposure.
You can organize multiple categories of items using these racks: Mount spice racks on pantry doors, cleaning supply caddies under the sink, or lid organizers for pot and pan storage. Consider using adhesive-mounted options for rental properties or when you don’t want to drill into cabinet doors. When loading items, place heavier objects at the bottom and lighter ones toward the top to prevent door strain.
Remember to periodically check mounting hardware for tightness, as door movement can gradually loosen screws or adhesive strips. Clean the racks regularly to prevent dust accumulation and maintain smooth door operation.
Label Everything
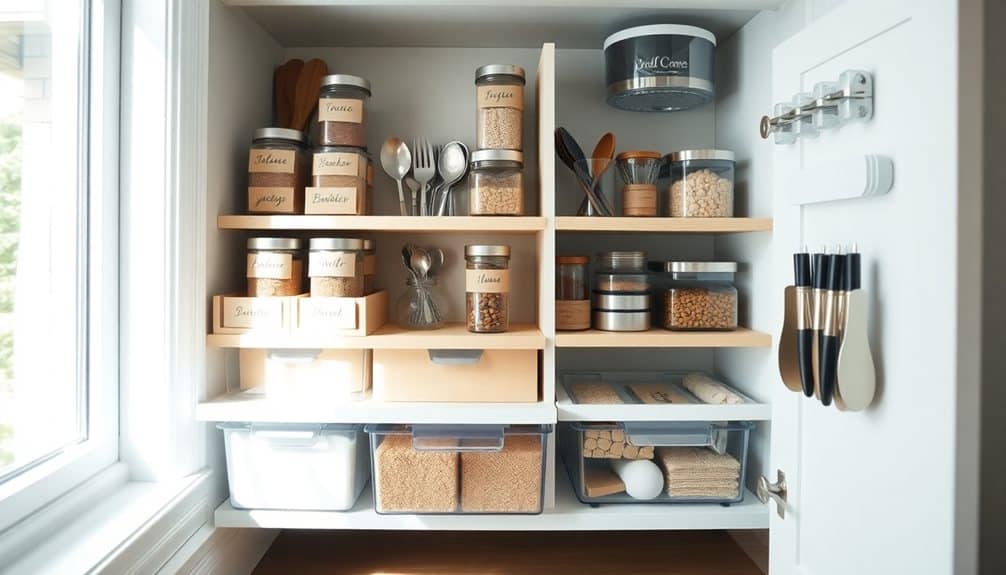
Once you’ve set up your storage solutions, clear labeling becomes the key to maintaining order in your kitchen cabinets. Start by investing in a quality label maker or waterproof adhesive labels that can withstand kitchen conditions. You’ll want to create consistent, legible labels that everyone in your household can read and understand.
Label the contents of storage containers, especially for dry goods like flour, sugar, and grains. Don’t forget to include expiration dates on transferred items. For spice jars, create labels for both the top and side to easily identify them whether they’re in a drawer or on a shelf. In deep cabinets, label shelf edges to indicate what belongs in each section.
For maximum efficiency, develop a logical labeling system. Group similar items together and use categories like “Baking,” “Breakfast,” or “Snacks.” If you’re using clear containers, still label them – it prevents confusion between similar-looking ingredients. When organizing cleaning supplies, clearly mark toxic items and keep them separate from food storage. Update your labels whenever you reorganize or notice they’re becoming worn or unclear. This systematic approach guarantees everyone can maintain the organizational system you’ve created. Consider using moisture-resistant materials for your storage containers and labels, especially in humid kitchen environments where standard materials might warp or deteriorate.
Add Shelf Risers

Inside your kitchen cabinets, shelf risers can instantly double your vertical storage space while keeping items visible and accessible. These versatile organizers create an additional elevated platform, allowing you to stack items without crushing or hiding what’s underneath. You’ll find shelf risers particularly useful for storing plates, bowls, cups, and canned goods in an orderly fashion. Similar to fridge storage bins, shelf risers help maximize every inch of available space while maintaining organization.
When selecting and implementing shelf risers, focus on these key considerations:
- Measure your cabinet’s dimensions carefully, accounting for both width and height clearance – you’ll need at least 6 inches of vertical space above the riser for comfortable access
- Choose risers made from sturdy materials like steel or bamboo that won’t buckle under weight, and look for non-slip feet to prevent sliding
- Opt for expandable risers when possible, as they’ll allow you to adjust the width to fit different cabinet spaces perfectly
Position taller items on the upper level and shorter ones below to maximize visibility. You can also combine multiple risers of different heights to create a customized storage solution that works for your specific needs and cabinet configuration.
Create Zones By Category

Every well-organized kitchen cabinet system starts with strategic zones based on logical categories. To create functional zones, group your items by their primary use: cooking, baking, food storage, serving, and beverage preparation.
Designate your upper cabinets near the stove for cooking items like spices, oils, and everyday seasonings. Store pots, pans, and cooking utensils in lower cabinets within arm’s reach of your cooking area. Create a dedicated baking zone by grouping measuring cups, mixing bowls, baking sheets, and cake pans together, ideally near your workspace.
Place your everyday dishes and glassware in cabinets close to the dishwasher or sink for efficient unloading. Establish a food storage zone with clear containers, organizing dry goods by type: grains, snacks, canned goods, and breakfast items. Set up a beverage station with mugs, glasses, coffee supplies, and tea accessories in one accessible area.
Label each zone clearly and maintain strict boundaries between categories. This system eliminates confusion, reduces time spent searching for items, and makes it easier to maintain organization long-term. When everything has a designated zone, you’ll naturally return items to their proper places. Consider investing in smart utensil organizers to maximize vertical storage space and keep drawers tidy.
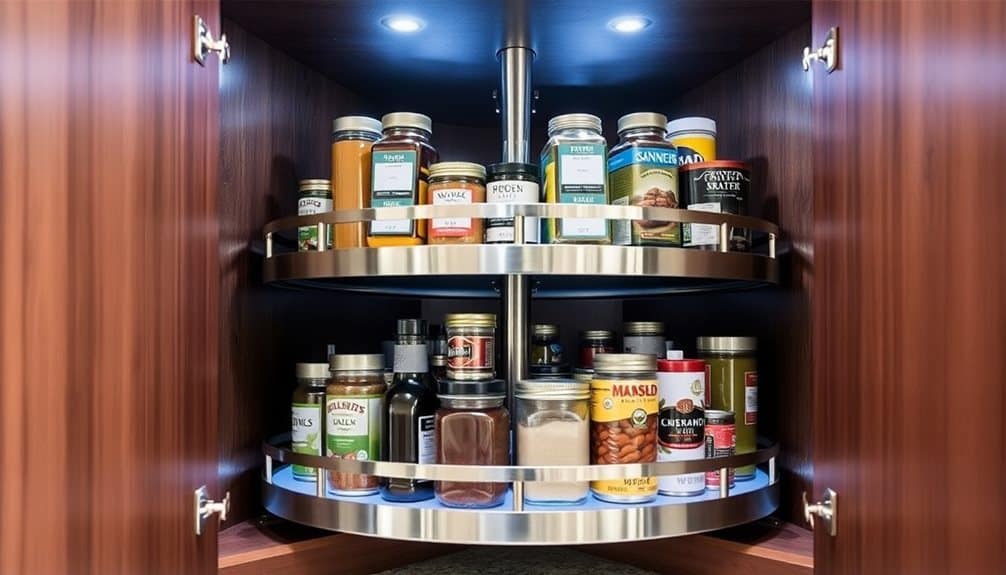
Utilize Lazy Susan Turntables

Lazy Susan turntables transform hard-to-reach corner cabinets and deep storage spaces into easily accessible areas. These rotating platforms eliminate the need to stretch, bend, or remove multiple items to reach what’s stored in the back. You’ll maximize your cabinet space while keeping everything within easy reach, making meal preparation and cooking more efficient.
Install different sizes of Lazy Susans based on your specific storage needs and cabinet dimensions. Single-tier turntables work well for tall items like bottles and cans, while double-tier versions double your storage capacity for shorter items. Choose sturdy models with non-slip surfaces and rimmed edges to prevent items from falling during rotation.
Here’s how to organize items effectively on your Lazy Susan:
- Group similar items together, such as oils and vinegars on one level, and spices and seasonings on another
- Place frequently used items toward the front for quick access, with less-used items toward the back
- Use clear containers or bins on the turntable to prevent small items from tipping over and maintain neat categories
Similar to the DeepFit snap-on structure found in expandable organizers, quality Lazy Susans provide secure storage for heavier kitchen items.
Implement Vertical Pan Storage

Vertical pan storage revolutionizes your cabinet organization by transforming chaotic stacks of cookware into an orderly, accessible system. By storing your pans vertically, you’ll eliminate the frustrating task of unstacking multiple items to reach the one you need, while also protecting your cookware’s surfaces from scratches and damage.
To implement vertical storage, start by installing tension rods or dedicated pan organizers in your cabinet. Position these dividers roughly 3-4 inches apart, depending on your pan sizes. Place your pans vertically between the dividers, arranging them from largest to smallest. For cabinet doors, you can mount rack systems that hold pan lids, maximizing otherwise unused space.
When organizing your pans vertically, group similar items together: skillets with skillets, saucepans with saucepans. You’ll want to guarantee each pan has enough space to slide in and out easily without scraping against its neighbors. If you’re using adjustable dividers, secure them firmly to prevent slipping. Consider adding rubber grip strips to the dividers for extra stability and protection. This system works especially well in deep cabinets or pull-out drawers, where vertical storage maximizes your cabinet’s full height.
Maximize Corner Cabinet Space
Corner cabinets often become dead zones where kitchen items disappear into a dark abyss, but with the right organization strategy, you’ll transform this awkward space into prime storage real estate. Install a lazy Susan turntable system to make every inch accessible and eliminate the need to crawl inside your cabinet to reach items in the back.
For maximum efficiency in your corner cabinet space, implement these proven solutions:
- Mount a two-tier lazy Susan with raised edges to prevent items from falling off during rotation. Position frequently used items on the top tier and backup supplies on the bottom level.
- Install pull-out corner drawers that slide and pivot outward, allowing you to store pots, pans, and large cooking tools without wasting vertical space. These units typically offer 90-degree access to your stored items.
- Add LED motion-sensor lights to illuminate dark corners automatically when you open the cabinet door. This simple addition helps you quickly locate items and prevents forgotten supplies from collecting dust.
Measure your corner cabinet’s dimensions carefully before purchasing any organizing solutions to guarantee proper fit and smooth operation of moving parts.
Stack With Cabinet Bins
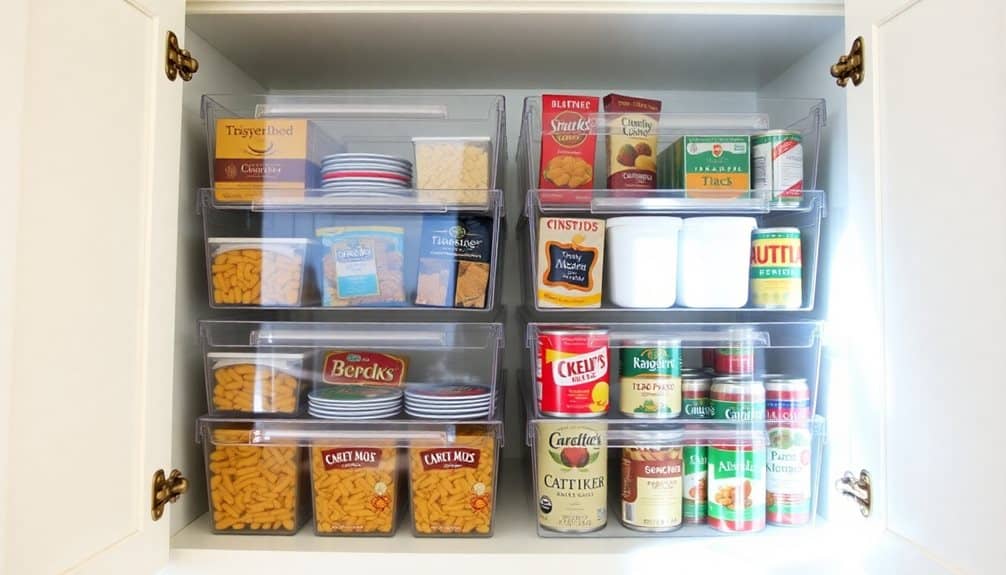
Effectively stacking cabinet bins transforms chaotic shelves into orderly storage zones that maximize your vertical space while keeping items easily accessible. Choose clear, stackable bins with front openings that let you access items without unstacking. Label each bin clearly on both the front and top for quick identification.
Start by measuring your cabinet’s dimensions and selecting bins that fit snugly while leaving enough clearance for easy removal. Place heavier items in bottom bins and lighter ones on top. Group similar items together – designate specific bins for baking supplies, snacks, or breakfast essentials. Use shorter bins for frequently accessed items and taller ones for occasional-use products.
To maximize efficiency, implement a rotation system where you move newer items to the back of bins while keeping older products forward. Consider using drawer-style bins for deep cabinets, allowing you to pull out entire sections without disrupting the stack. Install shelf risers between bin layers if you need additional vertical separation. Don’t forget to periodically audit your bins’ contents, removing expired items and reorganizing based on your current needs and usage patterns. For ultimate durability and sustainability, select bamboo drawer organizers which offer both eco-friendly benefits and long-lasting performance.
Hang Under-Shelf Storage Baskets
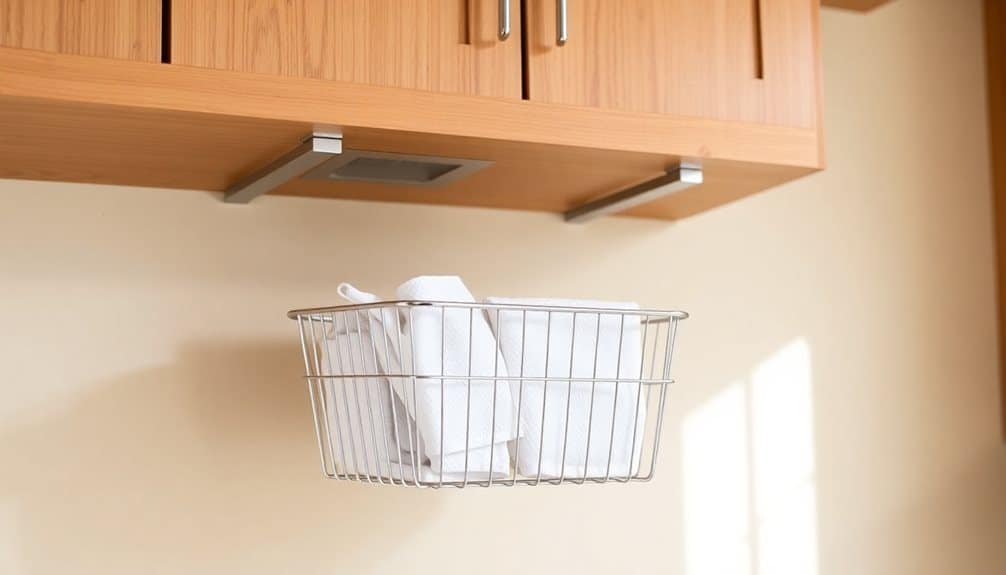
Maximizing storage space becomes effortless when you add under-shelf storage baskets to your kitchen cabinets. These versatile storage solutions attach directly to existing shelves, creating an additional tier of organization without requiring permanent modifications. You’ll instantly double your storage capacity while keeping frequently used items within easy reach.
Install under-shelf baskets strategically to organize different categories of kitchen items:
- Mount sliding wire baskets under upper cabinets to store coffee pods, tea bags, and small spice packets while keeping your main shelves free for larger items
- Attach drop-down baskets beneath pantry shelves to separate snacks, granola bars, and individually wrapped items that tend to get lost in deeper spaces
- Use pull-out mesh baskets under sink cabinets to organize cleaning supplies, sponges, and dishwasher pods while maximizing vertical space
Choose baskets with secure mounting mechanisms and consider the clearance needed for items stored below. Opt for rust-resistant materials like coated wire or stainless steel, especially in areas prone to moisture. You’ll find these baskets particularly useful in rental properties where permanent modifications aren’t allowed.
Sort With Clear Containers

Clear containers revolutionize cabinet organization by letting you instantly spot what you need while maintaining a visually cohesive look. You’ll eliminate the frustration of digging through opaque containers or dealing with half-opened bags that spill everywhere. Start by selecting containers in standardized sizes that stack efficiently and fit your shelf dimensions.
Transfer dry goods like flour, sugar, rice, and pasta into airtight clear containers immediately after purchase. Choose containers with wide mouths for easy scooping and secure lids to maintain freshness. Label each container with the contents and expiration date using a waterproof marker or adhesive labels. For maximum efficiency, group similar items together – baking supplies in one section, breakfast items in another, and snacks in a designated area.
Don’t forget to measure your cabinet depths and heights before purchasing containers. You’ll want to leave enough clearance to easily remove and replace items. Consider square or rectangular containers over round ones to maximize space usage. For items you buy in bulk, keep the overflow in their original packaging in a separate storage area, refilling your clear containers as needed.
Mount Lid Organizers

Inside cluttered cabinets, loose pot lids create chaos and waste valuable space. By mounting lid organizers on cabinet doors or walls, you’ll transform your storage while keeping lids easily accessible. These practical solutions help maximize your cabinet’s footprint and prevent the frustration of searching through stacks of mismatched lids.
Choose from several mounting options to suit your needs:
- Door-mounted rack systems that attach with strong adhesive strips or screws, featuring adjustable dividers to accommodate different lid sizes
- Wall-mounted vertical organizers with individual slots, perfect for storing lids upright and preventing them from sliding around
- Pull-out lid holders that install on cabinet slides, allowing you to access your entire lid collection with one smooth motion
When installing your lid organizer, measure your cabinet dimensions carefully and guarantee you’re leaving enough clearance for the door to close properly. Position the organizer at a height that makes sense for your daily cooking routine. You’ll want to group similar-sized lids together and consider labeling sections if you’re storing multiple types of lids.
Arrange By Usage Frequency

Your kitchen’s efficiency depends heavily on how you arrange items based on their usage patterns. Start by identifying your frequently used items, such as everyday dishes, commonly used utensils, and regular cooking ingredients. Place these within easy reach at eye level or slightly below, ensuring they’re accessible without stretching or bending.
Create three distinct zones in your cabinets: daily use, weekly use, and occasional use. Store daily essentials like coffee mugs, breakfast bowls, and cooking utensils in the most accessible cabinets nearest to their point of use. Weekly-use items, such as specialty cookware or baking supplies, can occupy middle shelves or secondary cabinets. Reserve top shelves and hard-to-reach corners for seasonal items, special occasion serving ware, or rarely used appliances.
Don’t forget to take into account your cooking workflow when arranging items. Keep pots and pans near the stove, food storage containers near the prep area, and dishes close to the dishwasher or drying rack. Regularly reassess your organization system and adjust it based on changing habits or needs. This frequency-based arrangement will greatly reduce your daily kitchen movement and save valuable time.
Group Items With Drawer Dividers
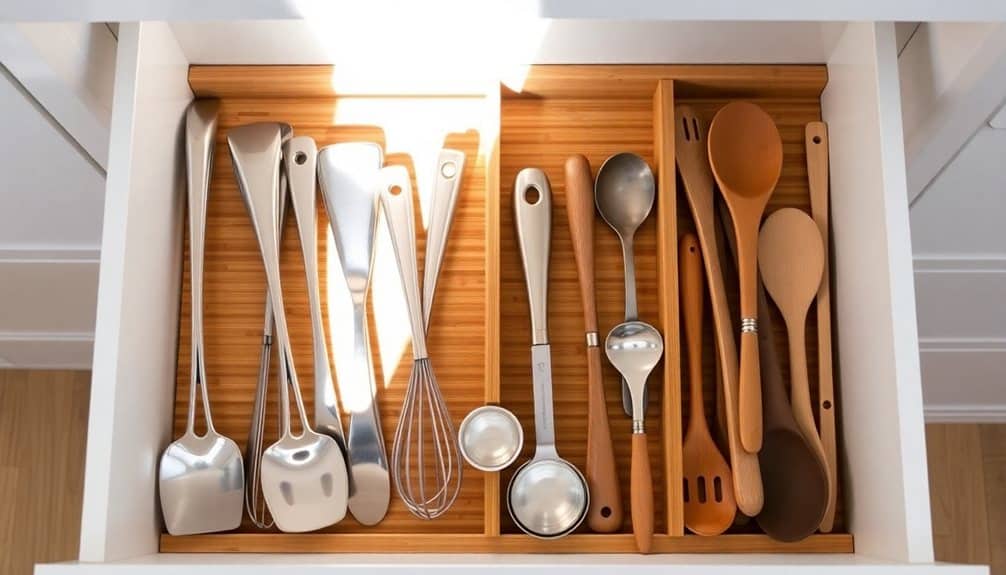
Well-organized drawers start with proper dividers that transform cluttered spaces into efficient storage zones. Installing drawer dividers helps you create dedicated sections for different types of utensils, tools, and kitchen gadgets. You’ll find items faster and maintain order when everything has its designated spot.
Choose adjustable drawer dividers that you can customize to fit your drawer dimensions and storage needs. Bamboo or plastic dividers work well, and they’re easy to clean and maintain. Don’t forget to measure your drawers carefully before purchasing dividers to guarantee a proper fit.
Here’s how to maximize your drawer organization with dividers:
- Sort items by category first – separate cooking utensils, measuring tools, and serving pieces before creating divided sections
- Position frequently used items toward the front of drawers, with less-used items toward the back
- Leave about 20% empty space in each compartment to prevent overcrowding and make items easier to grab
Consider using double-tiered drawer organizers for shallow items like cutlery, while deeper drawers can accommodate larger tools and gadgets. You’ll find that drawer dividers help prevent items from sliding around when opening and closing drawers.
Add Cabinet Door Hooks
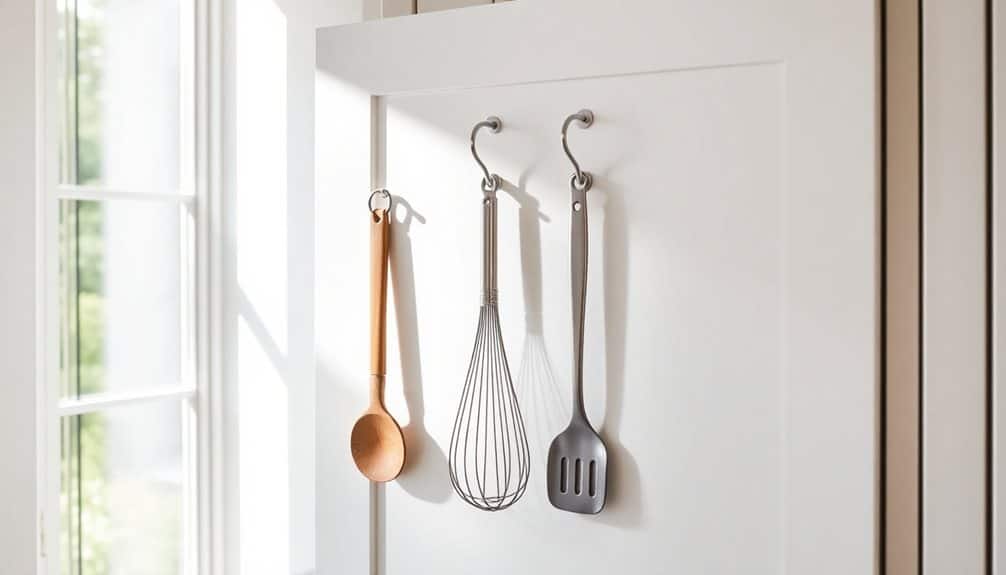
Beyond drawer organization, cabinet doors offer valuable storage potential that often goes unused. You can maximize this space by installing hooks, racks, and hanging systems on the interior of your cabinet doors. This solution works particularly well for storing pot lids, measuring cups, cleaning supplies, and cooking utensils.
Start by selecting appropriate hooks based on your needs. Over-the-door hooks work well for lighter items, while screw-in hooks provide more stability for heavier objects. When installing, measure and mark precise locations to guarantee items won’t interfere with shelves or cabinet contents when the door closes. You’ll want to leave about 2 inches of clearance between the hook and any interior shelving.
Consider using adhesive-backed hooks for rental properties or when you don’t want to drill into cabinet doors. Command hooks and similar products can hold up to 5 pounds and won’t damage the surface when removed. For frequently used items, position hooks at eye level for easy access. Group similar items together on the same door, and don’t overload the hooks – this can strain the door hinges and affect alignment over time.
Frequently Asked Questions
How Do I Measure Cabinet Dimensions Correctly Before Buying Organization Products?
You’ll need a tape measure to get three key measurements: width, depth, and height. First, measure the interior width from left to right. Next, measure depth from front to back. Finally, get the height from bottom to top. Don’t forget to account for hinges, shelf pegs, or drawer slides that might interfere. Always subtract 1/4 inch from your measurements to guarantee products fit properly.
What Cleaning Products Are Safe to Use on Different Cabinet Materials?
Just like your skin needs different care products, your cabinets require specific cleaning solutions based on their material. For wood, you’ll want to use Murphy Oil Soap or a mix of mild dish soap and warm water. On laminate, you can use all-purpose cleaners, while metal cabinets handle vinegar solutions well. Avoid ammonia-based products on any surface, and you’ll want to test cleaners on a hidden spot first.
How Often Should Cabinet Organization Systems Be Deep Cleaned?
You’ll need to deep clean your cabinet organization systems every 3-4 months, but high-traffic areas might require monthly attention. Remove all items, wipe down organizers with appropriate cleaners, and check for damage. Don’t forget to clean drawer slides, lazy susans, and pull-out mechanisms. Wipe down shelf liners, bins, and dividers thoroughly. Vacuum crumbs and debris before reorganizing your items.
Can Cabinet Organization Products Damage Rental Property Cabinets?
Like walking on eggshells, you’ll want to be extra careful when organizing rental cabinets. Most organization products won’t damage cabinets if installed correctly, but adhesive products, screws, and nails can leave marks or holes. Stick to removable solutions like tension rods, command hooks, or freestanding organizers. If you must use adhesives, choose gentle options and test in an inconspicuous spot first. Always check your lease agreement for specific restrictions.
What’s the Average Cost to Professionally Organize Kitchen Cabinets?
You’ll typically spend between $250 to $750 for professional kitchen cabinet organization services. The final cost depends on your cabinet size, current organization level, and location. Basic services start around $45-65 per hour, while extensive packages can reach $1,000+. Most organizers charge extra for organizing products and materials, which usually adds $100-200 to your total investment.